Showing posts with label kids. Show all posts

Monday, August 22, 2011

Back in Action


                Doodle Bug started first grade today. We had a lot of family time this summer. Now that school is back in, I’ll be able to regain my every other day blog schedule hopefully. Crafting and sewing went by the wayside for a bit too. I went days without even touching my machines or computer!
We started off summer with a shaving cream mess and ended with another one. 


The second was better because we also played in the sprinkler and Hubby made a homemade slip n slide! PS my kids don’t know how to slide! But they both had a blast none the less. 


Here are a couple of things I’ve made this summer as well.


I made Peanut this little outfit from left over fabric from one of her birthday gifts. I used an old 18 month onesie that was kind of masculine and had a funny shape. Cut off the bottom, serged the edge and the sleeves and appliqued on some of the trains from the fabric. I gave the waist band a little ruffle at the top by sewing a line across the top of the elastic casing before I put the elastic in. It turned out so cute! And my little GIRL Thomas fan gets something just for her! Have you ever tried finding stuff for girls with Thomas? It’s not happening! Which is totally irritating because my little fairy princess likes a whole range of things! Also, boycotting Party City because Thomas the Tank Engine is apparently just for boys! Rant over, moving on!

A bag I made for myself!

PUL envelope I made to carry Peanut’s WIC vouchers because the paper one they give you is just horrible!
Peanut’s 3rd birthday is coming up soon and maybe I’ll be able to get blogging some of the projects.

Monday, June 13, 2011

Sewing? I do that... don't I?

               Usually I sew without really thinking about it. I just sit down, think of what I want to create and off I go. But for some odd reason, now that I need to sew to make money, I can't! I am by no means short on supplies. It doesn't even have to be sewing, I can't seem to MAKE anything but dinner right now! I did manage to make Hubby some chocolate chip cookies for his birthday yesterday since he likes cookies better than cake though. I do wonder if I ran out of ideas or just don't have enough confidence in the things I make. Even though everyone always loves them I always doubt my skills. I just need inspiration... where to find insipration... I could make something to do with ducks!
              Speaking of ducks, here's Lucky! I can't believe how he's doubled in size. He used to be able to sit in my hand, now he needs both of them!


               We did however make it to the beach on Friday. It was really nice to just go and play and not worry about anything!


               So, I may not be sewing but I'm enjoying having my boy home for the summer!

Wednesday, June 8, 2011

Getting going

               I think if I didn't need to sleep there still wouldn't be enough time for me to feel like I can get ahead of all of my tasks! Right now I'm working frantically to get stuff listed in my Etsy shop. I started getting business cards out to people and now I've got to get stuff for them to look at and buy! Backwards, I know but I really wanted to get some of our school staff before the end of school, which is tomorrow. So in the next week or so if your wondering were I am or what I'm doing, I'll be at my desk, hip-high in fabric, thread, glue, and glitter!
               Once Father's Day is past our summer REALLY gets to start. I'm so excited to get to spend the extra time with Doodle Bug before he has to hit the books again. It's been a long, hard road for him this year and he's done amazing! He has done so much more than we'd ever imaged and succeeded so very well. He deserves a great summer and I intend to help him get the most out of it. Friday we will be going to the beach and doing some gifts to celebrate his achievement, we're all so excited! Even though I'm heart broken about my little boy growing up so fast and his teacher retiring!
So grown up

Monday, June 6, 2011

100th post!

               For my 100th post I had wanted to do something big and fancy... yeah, life happened and it just snuck right up on me! So instead here is what I've been up to.
I made this bag as a beach bag for Doodle Bug's (retiring) teacher. I took the idea from anusha's creative blog.
The bag
The detail
Doodle Bug graduated kindergarten and is now going to be my big 1st grader!

The boy
The boy and teacher
I also made this for our teacher. The picture is of one of our sunflowers that grew from the seeds she planted with the kids. The poem has double meaning!
The photo gift
This week/ past few weeks has had heart ache, but not the bad kind. It's hard to end things and to take on new things but it's going to be great and we've made some amazing memories along the way!


Friday, April 29, 2011

Fun Friday Fotos... I mean photos!

               Today was supposed to be the day I started my "$300 a month grocery budget" project. And then I was going to do a craft addition too. Yeah, so this didn't happen. I didn't go grocery shopping, I didn't even make a list yet. I haven't been in my craft corner all day.
               I got up this morning and watched the Royal Wedding while Doodle Bug got ready for school. I hadn't been over-the-moon excited about it but man once it started I was glued! And there's nothing like watching all of that beauty to make you look around yourself and say, "I really don't feel like doing the same boring thing right now!"
               So no crafty, no grocery budget, I didn't cook or clean or do dishes. Peanut and I watched movies. Somewhere in there she managed to shove a popcorn kernel into her ear. Hubby got a small rubber tube and suctioned it out really gently so we wouldn't hurt her. That was an interesting moment...
               Doodle Bug's allergies got the best of him a while after he got home from school. While he was resting, Peanut had some water play fun out in the rain. Then Hubby helped her pull and wash a carrot, she was so pleased and was so cute munching away!
               So enjoy some cutey picture of Peanut and her fun in the rain, and carrot amazement!


Friday, April 1, 2011

Birthday Cake!!!!

               As you probably already know, Saturday is Doodle Bug's 6th birthday. For some reason or another I've always had an inward struggle with myself about buying birthday cakes. Be it a money factor or contents or hassle, I've always hated buying sheet cakes! I've only bought 3 out of 7 for my kids birthdays. As of Saturday though it'll be 3 out of 8! Even better, right?
               My goal is to not buy a sheet cake ever again. One thing that will make that hard is the fact that our school has a strict "no homemade baked goods to be destributed" rule. Not only does that mean my dreams of a school bake sale are dashed but that I can't make my kids birthday treats for the class. This was a huge blow to me when Doodle Bug started school because to me being "that mom" was a right of passage that I would have to do without. I found other ways though to be "that mom". I sew, make, and June Cleaver my way into as much as possible! I may not be able to bake but at least I can still sew, craft, read, chaperone, and plain just be there and that's a great deal in my book!
               Anyway, back on track! Doodle Bug gets 2 days of birthday celebration. One at school in which we did have to get something store bought. We chose cupcakes. For his birthday at home with the family he wanted his standard vanilla cake, but when we pulled out the cook books he ended up picking a coconut sponge cake! He had also wanted pizza from a pizza place but he and I decided over dinner Wednesday night that we wanted to make our own instead. How awesome is this boy? He is really taking well to my transitioning us to a healthier life! I know your probably saying, "What's healthy about pizza and cake?" Well, it's better because there are no preservatives, I know EXACTLY wants in it, no strangers have touched it, and I save money which is a great stress reliever and stress is not good for your health!

 Here is a list of the cakes from birthday's past!
DB's 1st: Fish themed Carrot cake-homemade
DB's 2nd: Blues Clues- store bought
DB's 3rd: Pixar's Cars cupcake cake-store bought
DB's 4th: Fire trucks, vanilla cake-homemade
P's 1st: My Little Pony-bought
DB's 5th: Hot Wheels, vanilla cake-homemade
P's 2nd: Big Cupcake, rainbow cake-homemade

Friday, March 11, 2011

Crap, I did it again!

          Doodle Bug will be turning 6 on the April 2nd. Since December I've been getting things together here and there. I got a toy on clearance after Christmas, found him some Bakugan things on clearance, bought him a lot of books on eBay, as well as two different sheets for his "new" bunk bed. (PS, when I asked him what kind of sheets he wanted he said "Lightning McQueen and Spider Man for A***." He wants his best friend to spend the night and Spider Man is his favorite character while Doodle Bug's favorite is Lightning.) Asking him two dozen times what kind of birthday he wants to which he consistently answers, "Transformers!" So I also got his plates and napkins in Transformers theme, then got blue and black crepe paper and some Transformers stickers.
          So after all of that I thought, "Okay, I'm almost all set." No. No, I'm not. I spaced on the things I needed to make for him. Like the fact that I need to turn one of the flat sheets in each set into a fitted sheet. And the super hero cape and mask he asked me for after Christmas. This isn't a really a big problem. I can do those fairly easily. The problem comes in when I realize Doodle Bug is off for Spring break starting tomorrow. He'll be home for the next 9 days, which I'm totally stoked about and have tons planned to do with him! So I can't do any of his birthday crafting until he goes back on the 20th. Yeah, I know you're probably saying, "So what? You still have two weeks after he goes back, just do it then." To which I would reply, "Shut up, I'm just mad because I thought I was ahead, but I'm actually behind. Again. I always plan to get ahead and it usually doesn't happen." For Christmas I was done with everything except the day-of-cooking a week ahead. I still hold out hope that I can get the sheets and super hero set done by the 25th though. I can do it. Right? Just nod and say yes.

Monday, March 7, 2011

Applique patch toddler toy tutorial


 I spent a good deal of time this weekend hunting and gathering... new craft supplies that is. After going down every isle in the Wal-Mart craft section and hunting out odds and ends that were on sale or clearance, I headed to Joann's. Twice. Oh, and also to Michael's. Between lowered prices, coupons, and Peanut finding shiny things I came away with a nice new stash of pretty, fun, and potentially useful items. See?

Now I have so very many project ideas floating around my brain! I excited to get some going to share with you all!

Today is a really easy, quick project, in less than ten steps.
Peanut found this pretty butterfly patch on clearance and I don't think she realizes what it is. To her it's a toy, so I'm making it into one for her. She also recently started carrying a little purse around with her to hold her dearest possessions, so this will fit perfectly if she wants it to. Little hands need little toys right?

You'll need:
Applique patch
Iron
Scrap fabric
Little bit of stuffing
Basic sewing supplies

*Also you could do this with a patch on each side, instead of one. There was only one left when Peanut found us this little guy.*

Step one:
Cut two pieces of your scrap fabric roughly the shape of your patch and about 1-1/2 inches bigger all around.

Step two:
Iron on your patch to the middle of one shape.

Step three:
Sew around the edges of the patch for extra playablity!

Step four:
With right sides together, sew around the edges of the fabric, leaving a small opening for turning and stuffing.

Step five:
Turn right side out, pushing corners out with a chopstick (or whatever pointy object you prefer).

Step six:
Stuff to desired feel. I like it to be a little more on the hard side.

Step seven:
Sew opening closed. You can use a machine or do it by hand. I used the machine this time. I usually do it by hand because it's tough trying to get such a little thing under the machine after stuffing and I can use tiny little stitches when I do it by hand.

Now, there you go. A "little hand" friendly take along toy!
Enjoy! See you Wednesday!


Shared on


As with all of my projects, I have designed them for my family and love to share with you so you can have them for your families as well. All projects, patterns and directions are meant for your personal use and neither the patterns nor completed projects are to be used for monetary gain.

Friday, January 7, 2011

Kids Valentine's Cards with the Cricut


I've shared at


Photobucket


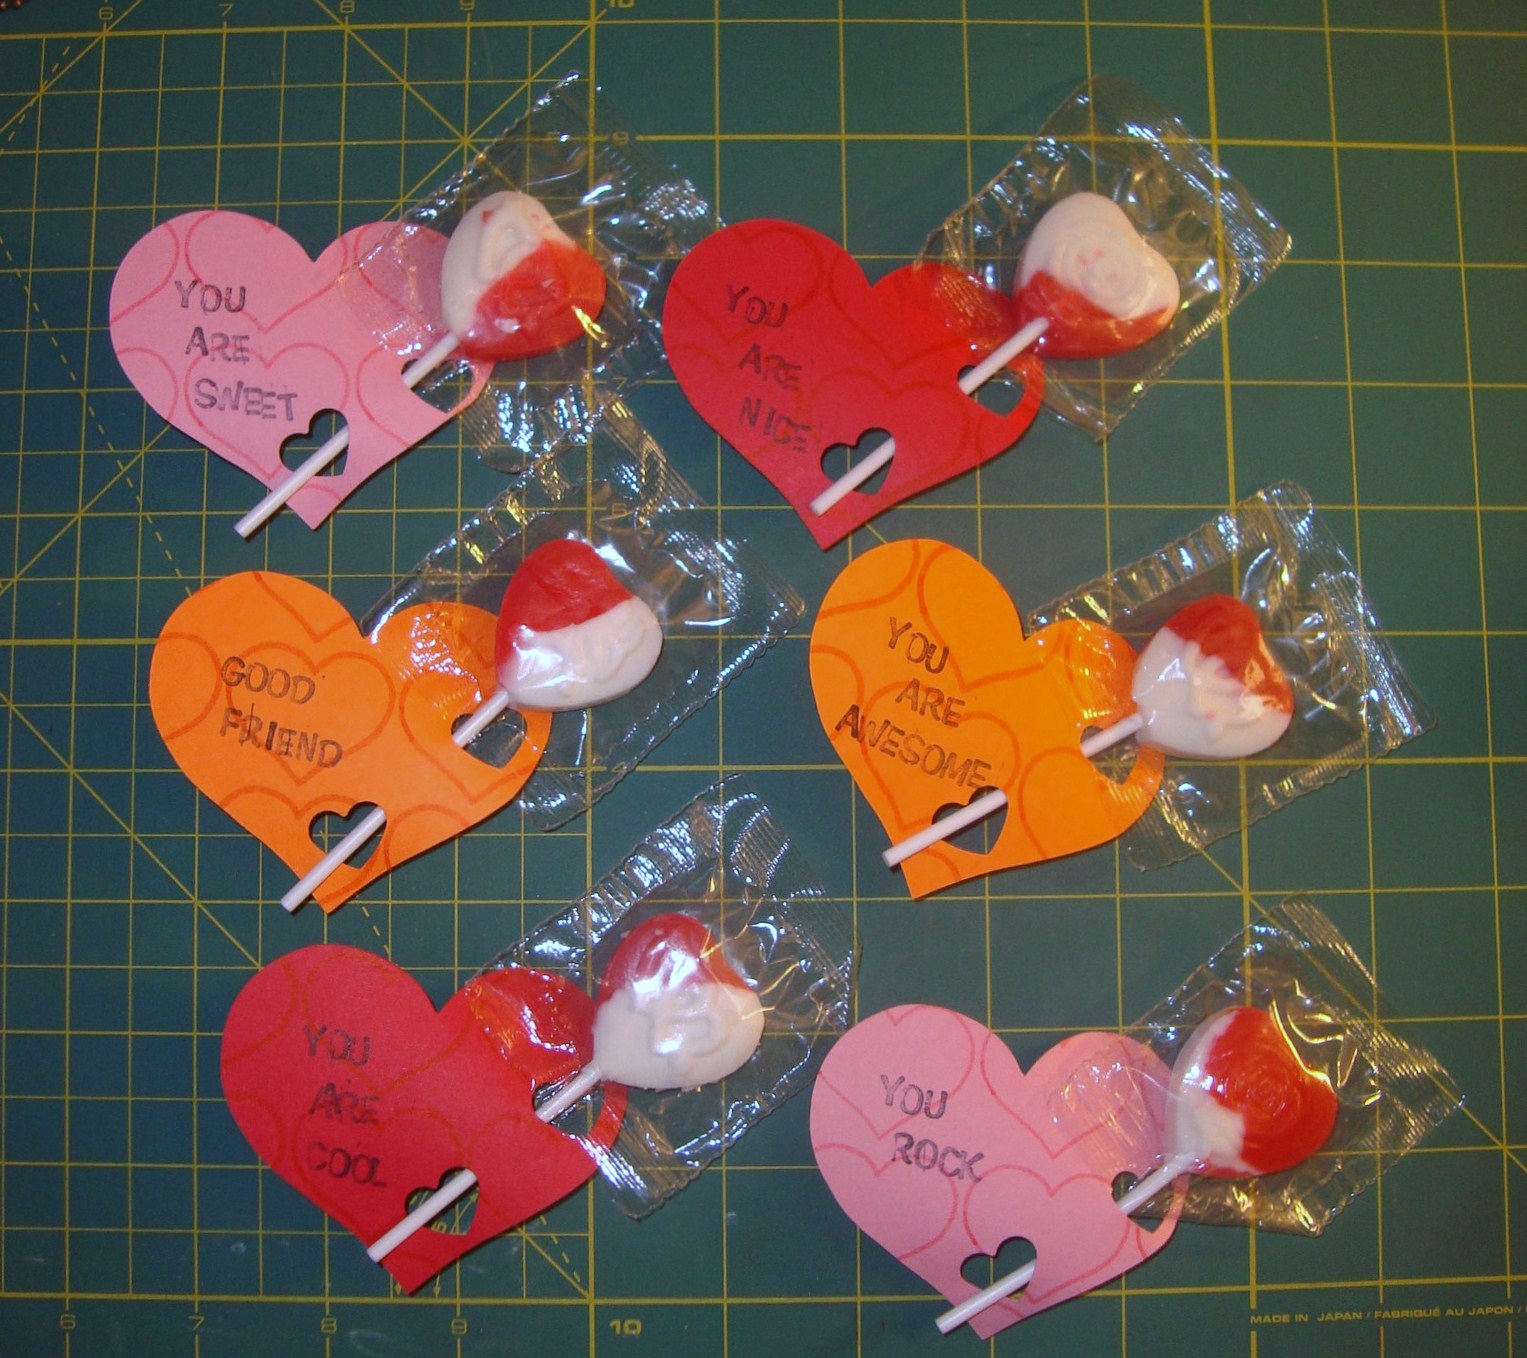
Usually I like to post projects anyone can do, but this one is geared for Cricut owners. Since I'm very new to my Cricut I'm pretty well satisfied at this project because I created it all on my own! It turned out so cute I couldn't help but share it. I'm not sure how many of you have a Cricut or have access to a friends maybe but I really need to share this one! It could also be done with some stamps, scissors and a lot of patience.
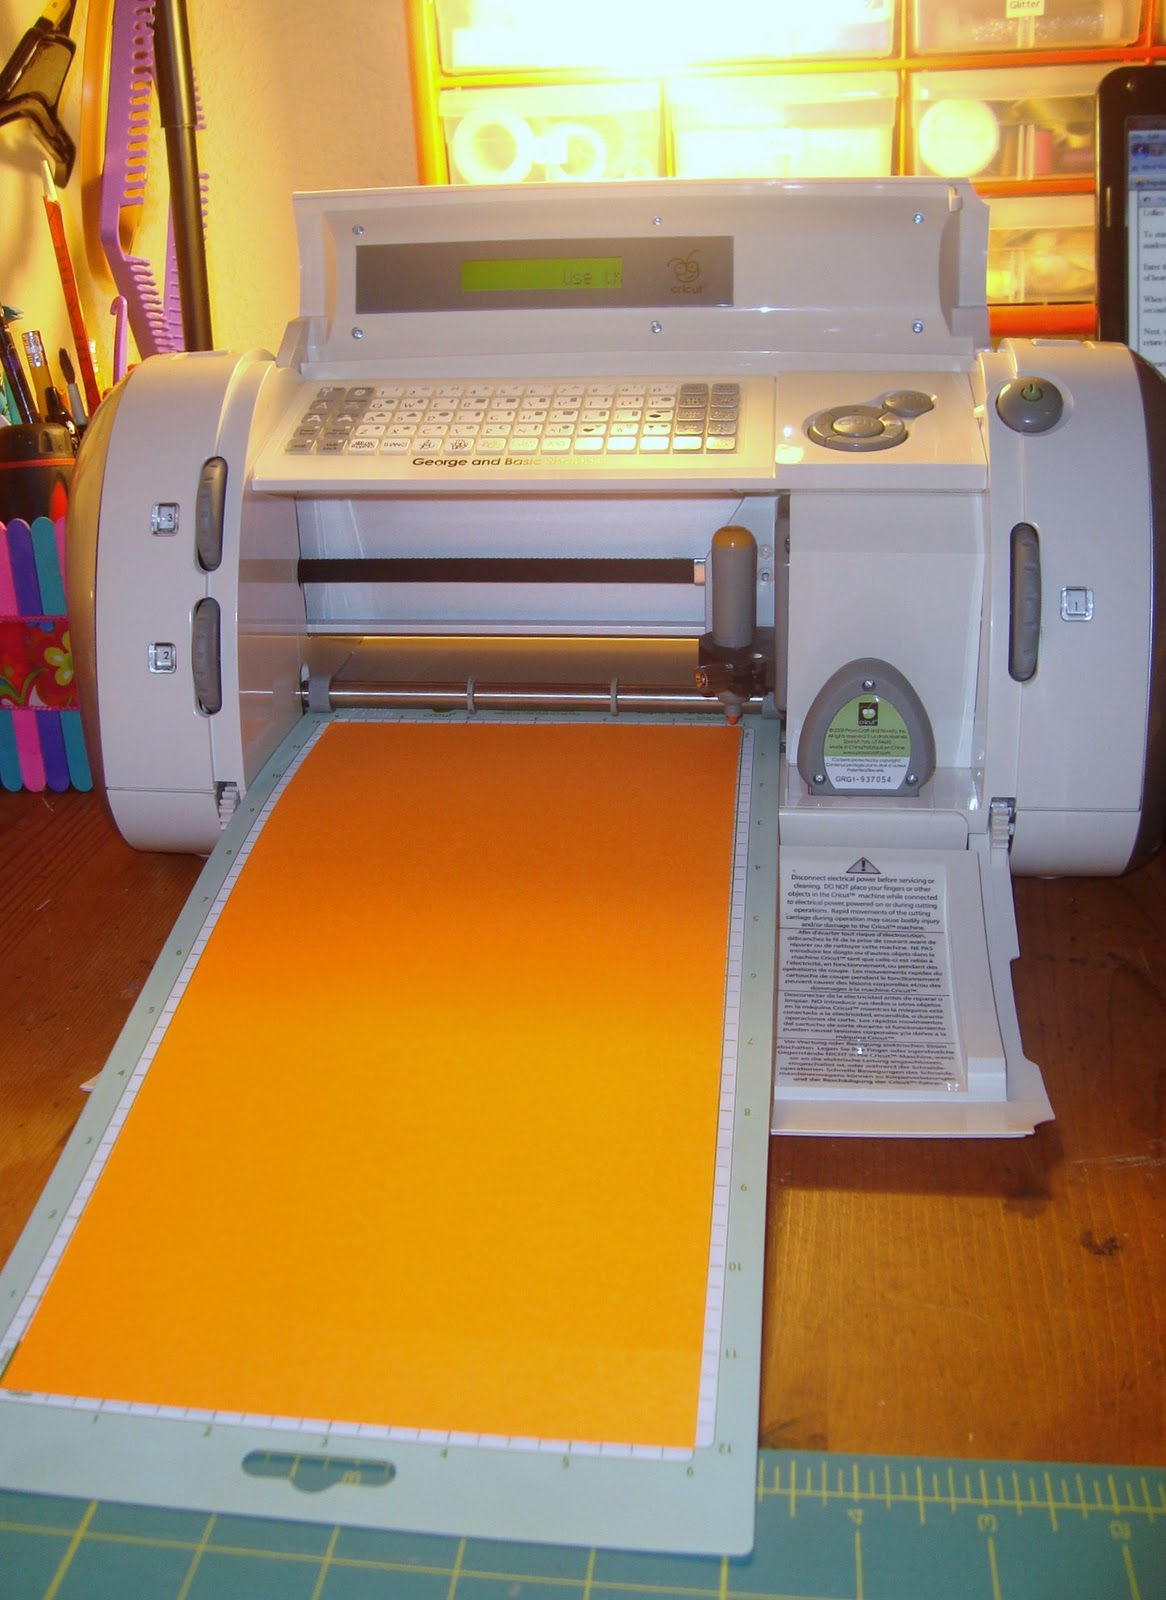
Mine is the Cricut Personal cutter which takes 12x6 paper.

You'll need:
Cricut
George and basic shapes cartridge it came with
Colored card stock
Cricut Color Ink markers to match paper
Heart shaped hole punch
Letter stamps and black ink pad
Clear tape
Lollies

To start load your paper and set your Cricut up to draw the hearts first. (Insert ink marker and set to the markers settings, which are Speed-3, and Pressure-2.) Set the size to 1.


Enter the heart icon. I use the fat heart, it's prettier! 9 hearts will make one line. You can max out the number of hearts on the display or enter 9 of them. I prefer to enter just the 9. Press cut. Note: I like to do the 9 because when the first line is done and you press the repeat last button it goes right back to the beginning of the paper and over. Once you get to the last line you don't have to count how many more you need to finish the last line!


When the line is done do not unload paper, hit the 'Repeat Last' button and then cut. This will create the second line. Continue with this until you have 5 lines of hearts, then unload the paper.


Next, set your Cricut to cut. (Remove you marker. I forgot this the first time! Insert your cutting blade and return your cutting settings. I used Speed-3 and Pressure-5.) Set the cutting size to 2 1/2. 6 hearts will use up the paper so enter 6 hearts on your display and press cut.


Unload paper and remove your hearts from the cutting mat. Now give your precious machine a break, she worked hard for you!


Use a heart hole punch to make a punch out in one corner and another at the bottom.


Stamp different sentiments on the front of the cards and the 'from' on the back (opposite corner of punches).


Stick a lollie through the hole and and tape the stick to the back.


And there you are, cute as a button little Valentines cards for your kid to proudly give at school or to family and friends!


As with all of my projects, I have designed them for my family and love to share with you so you can have them for your families as well. All projects, patterns and directions are meant for your personal use and neither the patterns nor completed projects are to be used for monetary gain.