Wednesday, January 12, 2011

Time for some new jumper dresses!

My little cousin's birthday was Saturday and I made this for her!They live in Ohio so I didn't get to try it on her. Hope it fits! That's one great thing about this type of dress, it has wiggle room.

When I got the scrub top I made that out of I also got this one for Peanut. She is just as excited about it as I am! I didn't take any before pictures of it and just jumped right to taking it apart. It had a breast pocket, and two side pockets. I didn't want to waste any of the fabric so I took out every single seam and pressed all of the fabric. Now it's all set to become her new favorite outfit, and possibly mine. Even though it'll be a toss up between this and the monkey dress I made her for Christmas.

Sorry for the bad picture, I had to pull it out of the laundry hamper!


Monday, January 10, 2011

"Being Mom"

According to my son, who has taken recently to saying, “You’re the best Mommy,” a mom cleans, sews and takes care of everybody. I find it amazing to look at things the way he does and to hear him say what he thinks. At his school they had a Christmas Shop where the kids could get gifts for their family and friends. Doodle Bug was amazingly in tune with what everyone would like. It’s really awesome to see what reminds him of specific people.
Around Christmas, maybe even on Christmas day, I had the idea to write this for my Mom and myself. I’m sure there will be more to add later. It took me longer to get around to than expected but I got it done! Here goes me sharing a little more of myself, and my mom, with the world.

Being Mom
Being Mom doesn’t stop.
Being Mom is not a job, it is a privilege.
Being Mom is coming when they call.
Being Mom is understanding them, because you did the same things.
Being Mom is watching them grow.
Being Mom is letting them go.
Being Mom is always being there, from across the country to across the street.
Being Mom is correcting them.
Being Mom is kissing boo-boos.
Being Mom is supporting ambitions.
Being Mom is late night runs to help with anything they need.
Being Mom is telling them why and not just what.
Being Mom is listening.
Being Mom is teaching morals and ethics.
Being Mom is being patient.
Being Mom is late night runs to the pharmacy.
Being Mom is wiping away tears.
Being Mom is reading to them until you fall asleep.
Being Mom is sharing the world with them.
Being Mom is teaching them manners.
Being Mom is teaching by example.
Being Mom is making mistakes.
Being Mom is telling them no.
Being Mom is passing on traditions.
Being Mom is being a leader.
Being Mom is not giving in.
Being Mom is laughing at knock knock jokes.
Being Mom is knowing they’ll make mistakes.
Being Mom is telling them everyone makes mistakes.
Being Mom is changing plans.
Being Mom is being continuously exhausted.
Being Mom is keeping the kid in you alive and playing.
Being Mom is remembering favorites.
Being Mom is loving unconditionally.
Being Mom is enjoying the moment.

Friday, January 7, 2011

Kids Valentine's Cards with the Cricut


I've shared at


Photobucket


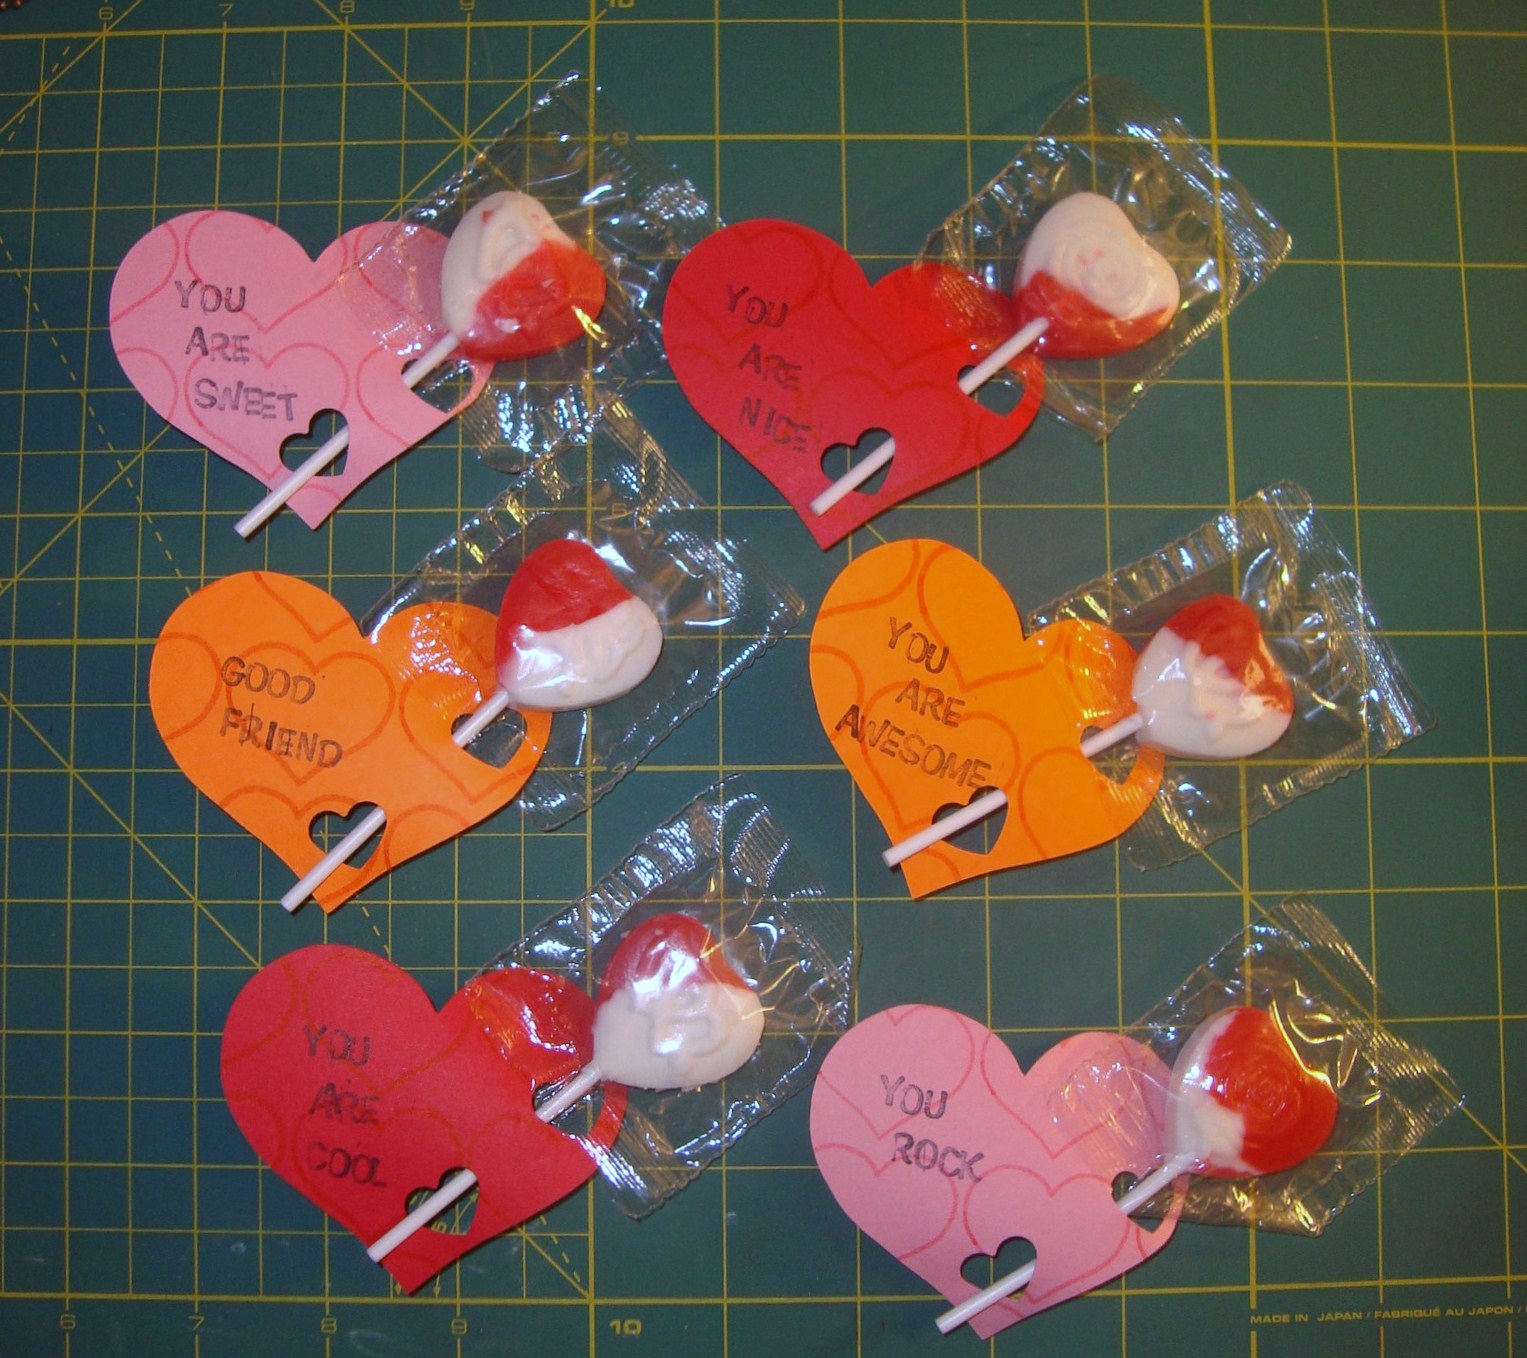
Usually I like to post projects anyone can do, but this one is geared for Cricut owners. Since I'm very new to my Cricut I'm pretty well satisfied at this project because I created it all on my own! It turned out so cute I couldn't help but share it. I'm not sure how many of you have a Cricut or have access to a friends maybe but I really need to share this one! It could also be done with some stamps, scissors and a lot of patience.
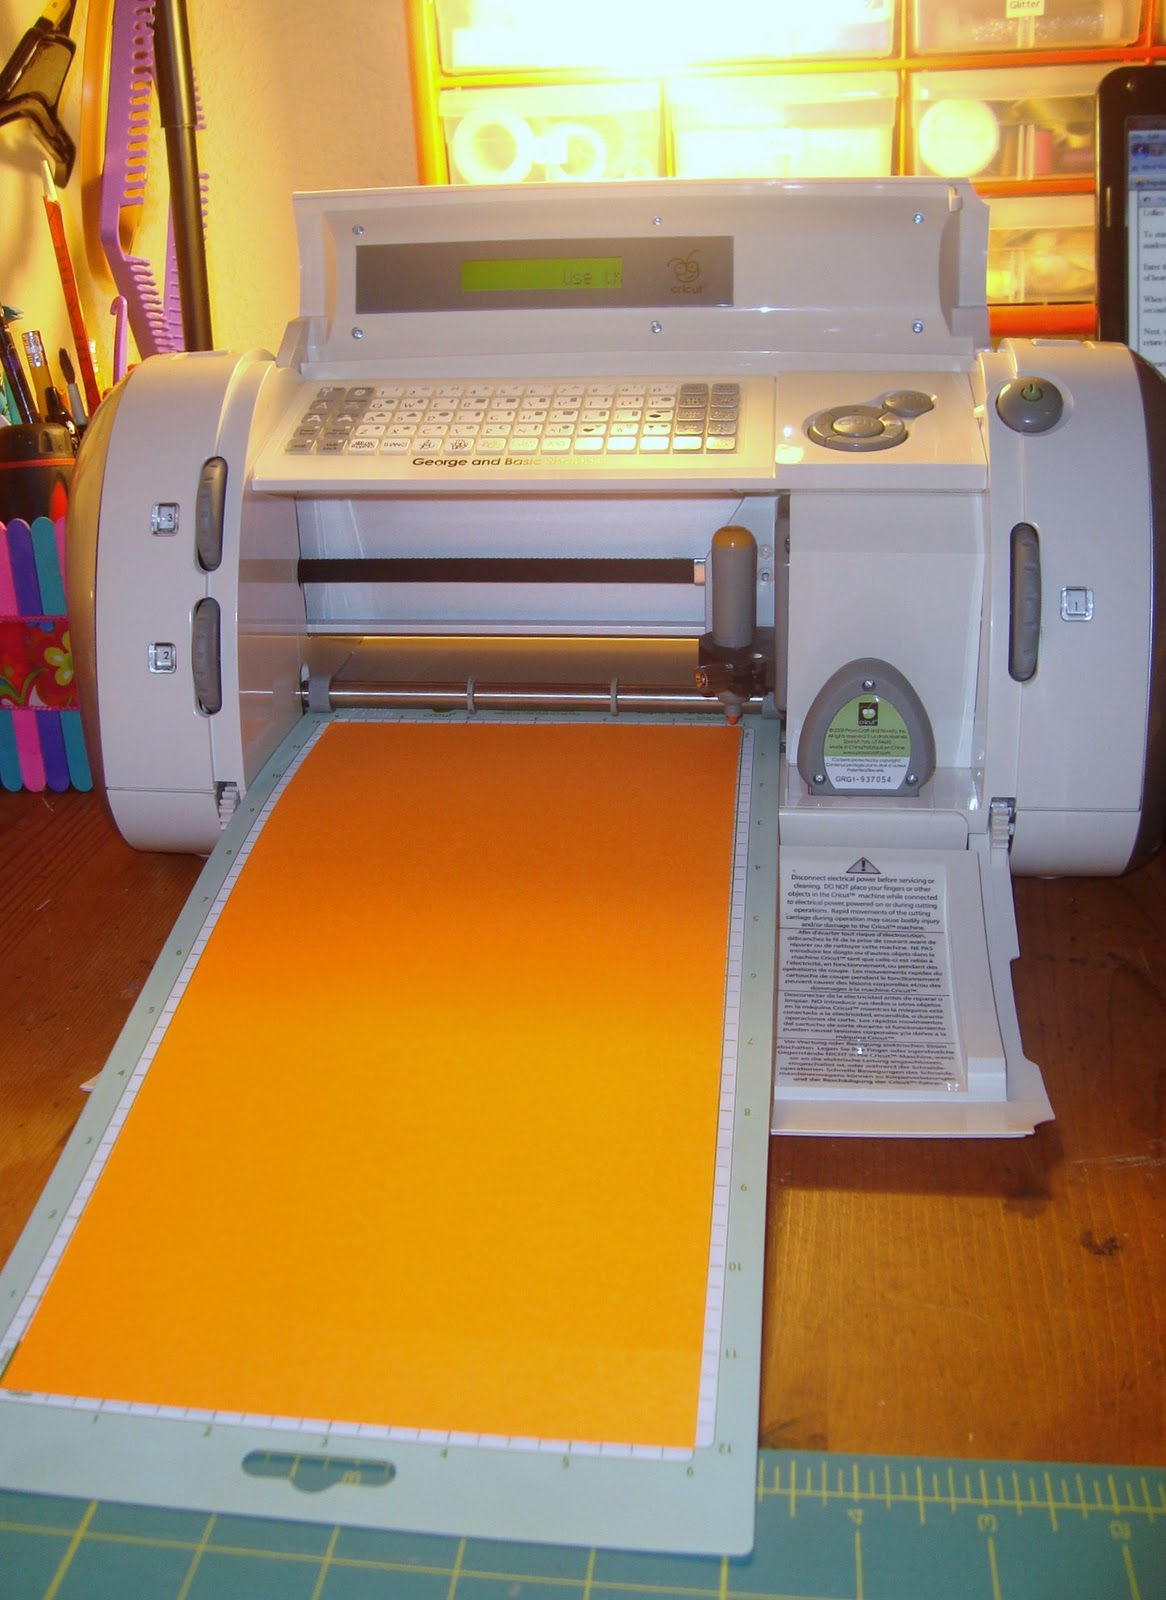
Mine is the Cricut Personal cutter which takes 12x6 paper.

You'll need:
Cricut
George and basic shapes cartridge it came with
Colored card stock
Cricut Color Ink markers to match paper
Heart shaped hole punch
Letter stamps and black ink pad
Clear tape
Lollies

To start load your paper and set your Cricut up to draw the hearts first. (Insert ink marker and set to the markers settings, which are Speed-3, and Pressure-2.) Set the size to 1.


Enter the heart icon. I use the fat heart, it's prettier! 9 hearts will make one line. You can max out the number of hearts on the display or enter 9 of them. I prefer to enter just the 9. Press cut. Note: I like to do the 9 because when the first line is done and you press the repeat last button it goes right back to the beginning of the paper and over. Once you get to the last line you don't have to count how many more you need to finish the last line!


When the line is done do not unload paper, hit the 'Repeat Last' button and then cut. This will create the second line. Continue with this until you have 5 lines of hearts, then unload the paper.


Next, set your Cricut to cut. (Remove you marker. I forgot this the first time! Insert your cutting blade and return your cutting settings. I used Speed-3 and Pressure-5.) Set the cutting size to 2 1/2. 6 hearts will use up the paper so enter 6 hearts on your display and press cut.


Unload paper and remove your hearts from the cutting mat. Now give your precious machine a break, she worked hard for you!


Use a heart hole punch to make a punch out in one corner and another at the bottom.


Stamp different sentiments on the front of the cards and the 'from' on the back (opposite corner of punches).


Stick a lollie through the hole and and tape the stick to the back.


And there you are, cute as a button little Valentines cards for your kid to proudly give at school or to family and friends!


As with all of my projects, I have designed them for my family and love to share with you so you can have them for your families as well. All projects, patterns and directions are meant for your personal use and neither the patterns nor completed projects are to be used for monetary gain.

Wednesday, January 5, 2011

My easy apron tutorial


I shared on


I know you're probably saying to yourself, "Another apron tutorial? But there are already so many out there!" And I would say you're right, but none of them are mine so here you go, another to add to the the list!

You'll need:
Fabric of your choice 17 inches x 28inches (longer if you want to add pockets)
Backing fabric same size
75 inches tying ribbon  or bias tape
Scissor/ rotary cutter & mat
basic sewing supplies


Press fabric


Pin together, trim edges if needed.


Fold in half, Cut out a triangle 4 inches from folded edge and 8 1/2 inches down.


Cut ribbon or bias tape to 3- 25 inch lengths.


If using bias tape sew down open edge on all 3 pieces and tie a knot in one end on two of the lengths. Leave the other un-knoted. If ribbon, just tie a knot in one end of two and go to next step.


With right sides of the fabric together, slide the un-knoted apron string in between the two fabrics. (Make sure the string is in between because otherwise your apron string will be inside when you flip it right side out!) Make sure the ends stick out just a bit and are about1-1/2 inches from the corner. Sew across entire top, locking string into place.


Next slide one string into the side about 7 inches down past the contour corner. Sew in place. Repeat on second side. Again make sure the strings are in between the fabrics.


Now sew the remaining edges, but leave an opening at the bottom of the apron for turning.


Turn and push out corners. Press and sew turning hole closed. I kept going and sewed all the way around the perimeter of the apron. I like the look better! :)


See? Super easy! Now wear with pride because not only can you sew you can (at least look like you know how to) cook! 


As with all of my projects, I have designed them for my family and love to share with you so you can have them for your families as well. All projects, patterns and directions are meant for your personal use and neither the patterns nor completed projects are to be used for monetary gain.

Monday, January 3, 2011

Christmas, kids, gifts and love

     *****I have a little confession to make, maybe everyone does it, I don't know. But when I write a post I just write what is in my head first, then title it. After titling I edit. While editing this one I thought to myself, "Well geez, the title really sums up all those words so quickly, why did I need to write that much?" But then I realize it's because I like to share good things with the world! And my family is a good thing! (No, I'm not Martha Stewart but it is the best choice of words I could find!)*****
     Now that the hustle and bustle is over for now I can come back to bloggy world with a clear conscience and not feel like I'm neglected my everyday duties.
     Hubby and I celebrated our 7th Wedding Anniversary on Saturday. It doesn't seem like that long at all. 
     Also I must say I've thoroughly enjoyed having Doodle Bug home for 2 weeks! He is getting so smart and I really got to see him work! We spent a lot of time in the kitchen baking which was amazing. At one point we were measuring flour for our sugar cookie recipe and I told him we needed 5 cups. After adding 3 cups I was stirring and he just up and says, "Now we need 2 more!" I was stunned! My 5 year old kindergartener had just done a math problem in his head! We also spent time with the letter magnets on the fridge. I would tell him to find me an A and he would, and so on and so forth. He knew so many more than he did just a month before. He is turning into quiet the little scholar!
     Christmas I can say was pretty amazing too! The kids were so happy and Hubby was thrilled with his gifts. The one gift I had made for my mom was an appliqued shirt that said loved, it was one of her late husband's shirts. I had a lot of emotion invested in that one gift! When I showed my sister up north I told her I was afraid it would make Mom cry, but when it came down to it I was the one in a blubbery mess! Later Hubby told me, "Your mom was doing fine until you cried!" Oops, my bad, but I couldn't help it! It was almost a year in the 'in-my-head" stage and finally having it in her hands was emotional.
     And now about MY gifts! Holy cow! Hubby got me a new sewing machine! Also my mom got me a Cricut! Both have been used for projects already. I made myself a reversible tote bag with four pockets and a new wallet with my sewing machine, as well as a few small things. With my Cricut I've started Doodle Bugs Valentine's for his class and made my mom's birthday card.
      Now stayed tuned because on Wednesday I'll have a new tutorial for you!