I've shared this tutorial on The Sugar and Spice Weekly Link Party at


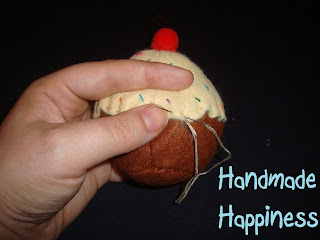
It's my birthday tomorrow, so I figured it would be the perfect day for my felt cupcake tutorial! I only have one to show you right now as the other 5 are in the middle of "baking"!
You will need:
*Template- click here
*Felt for bottom and side of cupcake. In this case, it's chocolate brown.
*Felt for frosting. This one is a cream cheese frosting.
*Matching embroidery thread for both.
*Poly fill
* optional-4 to 6 different brightly colored embroidery threads for sprinkles
* optional-red pompom and maroon embroidery thread for cherry

Now that you have all of you supplies, lets get started.
Cut out your pattern pieces from your felts.
Sew the triangle cutouts together to form your cupcake top.


Embellish you top now. I added colorful sprinkles all over by just taking 2 stands of embroidery thread, and "sprinkling them all over in random order to look like real sprinkles.

I also added a cherry I made myself. To do this take a cherry sized pompom and threaded 4 stands of maroon embroidery thread through the center of it starting at whatever point will be the bottom.
Pull the threads tight at the top and go back down to the bottom and then back up to the top. If you pull it tight it will hid the threads and make a little pucker in the top like a real cherry.
Now place a knot about an inch up to make your stem. Cut the excess as close to the knot as your comfortable with.

Sew to the top of the topper. You now have your cupcake top.

Onto the bottom, take the curved side piece and sew together the edges to make a little open ended cone.

Keeping the cone with the stitched side out, sew the small round bottom onto the cone.

Flip right side out so stitching is all on the inside of you cupcake bottom now.

Carefully line up your top to your bottom (you could pin it to keep it in place but I don't have a picture of this).

Stitch along the edges, making sure to always hit both the bottom and top with each stitch. Leave about 1-1/2 inches open to stuff.


Now stuff to desired feel and sew up the rest of the edge.


I made these to fit into a regular muffin pan so I could make a half dozen and it would be perfect for play.


I'm off to celebrate with my family! Have a great day!
As with all of my projects, I have designed them for my family and love to share with you so you can have them for your families as well. All projects, patterns and directions are meant for your personal use and neither the patterns nor completed projects are to be used for monetary gain.
This is very sweet! I like the little confetti top. Thanks for sharing ... I've posted a link.
ReplyDeleteHi~ Did you happen to get the pattern scanned? These are so cute & I can't wait to make one!!!!! TYSM!
ReplyDeleteThis is really cute! It would also work great for a pin cushion!
ReplyDeleteMark: I will actually be getting that done tomorrow afternoon. It should be up by tomorrow night!
ReplyDeleteThe link for the pattern doesn't lead to anything. It says page can't be found or I don't have access.
ReplyDeleteThank you for letting me know. I did a little tinkering, it should work now.
ReplyDelete