

Plus craft eNVy made me a highlight! Yeah!

School started for us Monday and I still hadn't put my son's name on his new backpack until today. I didn't want to write on it or permanently affix anything to it so a luggage tag seemed perfect. I don't generally keep any around so of course I attempted to make one. Here is that tutorial. I'm not 100% happy with the way it turned out and the pictures I took so I'm going to revise it after I make a better one. But in the mean time, here we go!
You will need:
sewing machine and thread (I used clear because I didn't have orange)
6x8 fabric (I used felt because the edges of mine are raw and felt doesn't fray)
3x5 clear vinyl (or recovered plastic from something with enough flat space. I used the back of a plastic box from our new shower head!)
an eyelet and tool to apply it
a key ring
scrap cardstock for insert
glue stick
*Sorry I don't have a supply picture.*
Okay, so start by cutting 2 rectangles, 3 1/2 inches by 4 1/2 inches, from the fabric.
Cut 1 rectangle the same size from the plastic (or vinyl).
Cut out the center of one piece of the fabric, about 2 1/4 by 3 1/4. Round all corners.

Set aside the the fabric piece without the cut out.
Now apply a bit of the glue stick around the very edge of the plastic.

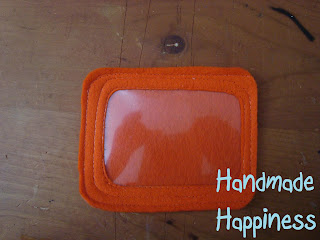
Line up with the fabric with the cut out and the plastic and press it on.

Now sew along the edge of the inside, pretend like the little yellow line in the picture is this stitching.

After I did this I also stitched another line all the way around a little father out. You don't have to and I really don't remember why I did in the first place!!
Now place the other cut out on the one with the plastic, the plastic should be on the inside now. Sew together both long sides and across the bottom close to the edge.

Now apply the eyelet to the top corner of the sewn together side. I placed mine on the stitch line so it wouldn't make it hard to fit a card into later.

Now put the key ring on.

Cut out a rectangle 3 3/4 by 2 3/4 from the cardstock. Round the edges. I choose to write name, grade, and teacher on mine. You can do whatever fits your needs of course. Slide the card in the open end.

EDIT: Okay after a few days of my son running and his backpack bouncing all over, I noticed the card would slide out. To fix this all I did was attach an eyelet to both the back and front pieces of the tag at the opening and tied it closed with a bit of embroidery thread. When I need to change the card I just have to untie (or cut) the thread. Problem solved, now he can bounce his backpack all he wants and the card stays put!
Now trim up the edges and your all set to put the tag on your little ones backpack.


As with all of my projects, I have designed them for my family and love to share with you so you can have them for your families as well. All projects, patterns and directions are meant for your personal use and neither the patterns nor completed projects are to be used for monetary gain.
Hi, I found you on the Blog Hop and thought I'd stop by. I'm impressed - so many usable creations you've made and shared directions through the tutorials. Great job - What a lucky family!
ReplyDeleteGreat demo, thank you for posting. I found you on the Blog Hop.
ReplyDeleteThis is just the information I am finding everywhere. Thanks for your blog, I just subscribe your blog. This is a nice blog.. Diplomas for sale
ReplyDelete