Growing up I remember always loving putting up our advent calendar. It was green with a little snowy scene with little mice. It had 25 little pockets all lined up and my mom and I would fill it with little chocolates or candies of the Christmasy sort. It hung at the bottom of our stairs on a rustic real wood wall. I loved it. It still makes me smile. My mom still has it actually, and I hope it inherit it one day. But for now I'm making one for my kids. Not with the same image but I'm keeping with the design. I am so excited to share this tradition with kids.
Now this isn't a hard project but has a lot of steps so I'm breaking it up into two parts. One thing I hate about some tutorials (mine included) is that they seem to go on forever and I find myself just scrolling through not really reading and then I just take the idea a wing it. Well, I do that no matter what actually, which usually leads to fails that I have to start the project over! But this one so far is coming together amazing.
I didn't design the applique myself this time because I wanted to make the process a little shorter. I went to Wee Folk Art which is the first ever craft blog I ever read plus the first tutorial I ever used. If you haven't been there GO! The Mother-Daughter team is amazing, they have so so so many amazingly great tutorials, appliques, recipes and ideas.
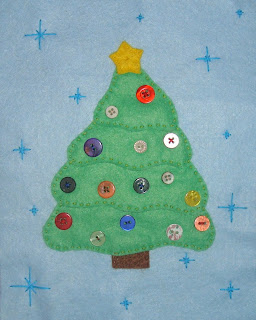
I did use their applique design but of course tweaked it a bit. I added and extra tier to the bottom, took out the snowy background and added a trunk, and flipped the direction the top points. I also didn't follow the directions for the stitching.
Okay, enough chit chat here's Part one of my Advent calendar, the top appliqued panel.
You'll need:
Applique design-here is the adorable Wee Folk Art one I used
Embroidery supplies
Fusible fleece
Buttons or other tree embelishments
Felts-I used an evergreen for the tree, dandelion for the star, buttermilk for the back that will be behind the pockets, dolphin for the back pieces, sky blue for the applique background, and red for the pockets.
Let's get going by cutting out your pattern pieces from your felt and lay them out how you want them.
Now place your design on your background felt where you wan it and trim you felt so it's a workable size. My felts are 12x12 by default so I cut it down to about 9x7.
Now stitch your pieces together and lay your design back on your background.
Once you have your design where you want it stitch it to the background by going all around the outer lines.
Then I stitched the second star on top of the one that was already on there.
Then I stitched some straight lines on the truck to make it a little bark like.
Here is what it looks like.
Now position your embellishments. I took a picture once I had them all where I wanted them so when I took them off I could refer back to it for placement.
Then I sewed them on.
Next I stitched little stars/snowflakes all over the background.
This is it for the applique portion. See you on Friday for the rest of the calendar!
Now go see the ladies over at Weefolkart.com for some great inspiration!

As with all of my projects, I have designed them for my family and love to share with you so you can have them for your families as well. All projects, patterns and directions are meant for your personal use and neither the patterns nor completed projects are to be used for monetary gain.


Lovely! I'm sure some day your children will think back on their advent calendar with the same fondness that you remember your childhood one.
ReplyDeleteLovely! Thank you!
ReplyDelete